Showing posts with label Pinterest. Show all posts

Wednesday, May 8, 2013

Project Life Worthy

I love Project Life. It allows me to record my day to day...no matter how mundane. But even after living in the same house for years,  I have come to realize that my daily routine has changed so dramatically since that first day here.  I want to remember the way it use to be. I want to be able to share with my grandchildren what this house use to look like...better yet, have them judge the old fashion decor that for the time being is fresh and new.

I am a story teller by nature.  Perhaps that is why I blog.  I blog because I see a story in everything.  Unfortunately, what I see in my head doesn't always translate well in pictures.  According to my pictures, my world has dark shadows, is blurred and always tilted to the left or right.  At times it even seems washed out. I thought buying a new camera would help. And it did to some degree. My world isn't so yellow anymore.  But my pictures were still ...eh at best.

So when my daughter asked me to take pictures for her and her boyfriend before prom, well I panicked.  This young man was celebrating his Senior prom and they wanted me to capture that moment in his life. I had seen his Senior pictures and they were great....no, they were better than great. They were amazing.  So when she asked me, I immediately said, "Sure. No problem.  I would love to do it."  with much confidence and no hesitation.  I  had 24  hours to come up with a place and poses.   Again I say thank goodness for Pinterest. I searched Prom, which by the way, will pull up a bunch of celebrity prom pictures.  So after about an hour of looking at their pictures and laughing, I finally searched up prom poses and made mental notes.  And then when I got to Pine Gully Park, a park off the water about 2 minutes from my house, I forgot all that I saw and just winged it.  The only pose I do remember is the one with someone in front and the other in back. (By the way, if you have a DSLR and you don't have a nifty fifty...get one)

I think for once in my Project Life scrapping I will have pictures that reflect the story I see in my head.  I really can't wait to put these in my album.

So this is what my world normally looks like through they eye of the camera:
Awkward picture in front of door

Bit blurry and dark
Then I took a deep breath and calmed my nerves and took some more pictures.  We had to hurry because the sun was setting..well hurry as fast as a girl can go in stilettos in the grass or across a pier.

the gentle kiss on the forehead, he is a good guy in our eyes

One of the poses from Pinterest...and yes he has a funny personality

Asked them both to pose, funny that they look similar

For this moment he is her world

So my story for prom is how it is a magical moment in one's life.  How what we wear speaks volumes about the fashion of your generation.  How that special person in our life at that time seems like the world. That many have their first loves in high school.  The funny pose is a reflection of their lightheartedness towards each other   And the kiss on the forehead speaks volumes about how this young man has been nothing but a gentleman and how he was the first person to court my daughter.  So for this moment, this is her world.

Thursday, April 25, 2013

Breakfast at Tiffany's Crop


This past weekend I through a Breakfast at Tiffany's crop.  I had so much fun doing the decor for this one!  Of course my first source for ideas was Pinterest.


Each person received one.  This one is actually in a Tiffany blue box.

Similar to the one I saw here.

I had a family emergency the weekend before so I didn't have time to paint the boxes properly, so at 4 am the morning of the crop, I found some acrylic paint in my scrapbook stash and mixed a few colors to come up with Tiffany blue.. (here's to not throwing anything away even when you haven't used it in years). So here is my version.

The box on the left is an actual box that is Tiffany blue that my husband bought me years ago to go with my scraproom.  ( I have a wonderful husband who buys me things for my birthday that I will actually love and use.)  The box on the right is a box I purchased at Hobby Lobby for $1.49 and painted.  I stuffed the bottoms with the plastic bags from the table liners, then I put tissue paper on top.  Each box had three sizes of bling, a tiara from Party City and either either some of my costume pearl jewelry or some pearl strand I found in the ribbon section at Hobby Lobby.  Here is a close up of the inside.
I also found this cute wedding gown cut on the Silhouette store.  It wasn't quite what I wanted so I tweaked it just a bit.  Once I had it just like I wanted, I was able to cut three per 12x12 black cardstock.  I then used the same technique that I used at the baby shower, to make the dresses stand up.  You can see the how to HERE.
I also pinned this wonderful centerpiece that I had to try. I couldn't find the directions to it and I have not done a floral arrangement before so I did my best.


Here is my version:


And no, I did not paint my art niche for the party. It just so happens that the color I chose as an accent color throughout my whole house is Tiffany blue (see previous posts).  I took apart a Christmas ornament for the bling on the branches.  I bought the flowers at, you guessed it, Hobby Lobby. And BONUS they were 50% off.  I already had the vase and the branches.

I also made a Tiffany Blue punch.

I used Blue Hawaiian Punch, a large can of pineapple juice and pineapple sherbert....oh and spike with your favorite liquor if you want.   

Everyone was given given a Tiffany blue gift bag for their trash, a Holly Golightly mask, a tiara and a luggage tag.  Cheryl, the creator of our scrapbook group found them at Michaels.  They had Holly Golightly on one side and we decorated the back side with our names.


I look forward to these crops each month. Sadly, I will not be hosting again until July.

Friday, April 5, 2013

Dresser Makeover

Leave it to me to take on more than I can handle.  This is my first real make over of any furniture.  So what did I decide to do?  Well, I decided to take all my bedroom furniture and an armoire out to my garage and paint them all at once.  At the time of the decision, it made sense.  They all needed to be primed and most pieces were being painted the same color.  And on top of it all, I decided to blog about it. I made a promise to myself a few months ago that good or bad, I was going to blog my results of things I tried. Ouch!

One of my  first pins on pinterest was this one from Censational Girl.

I must have pinned it the first time about a year ago. I say the first time because I have pinned it several times since then.  (You know that awkward moment when you just finished pinning 4 or 5 things only to discover that what you were looking at was one of your own boards, so you basically repinned yourself?  yeah been there, done that)
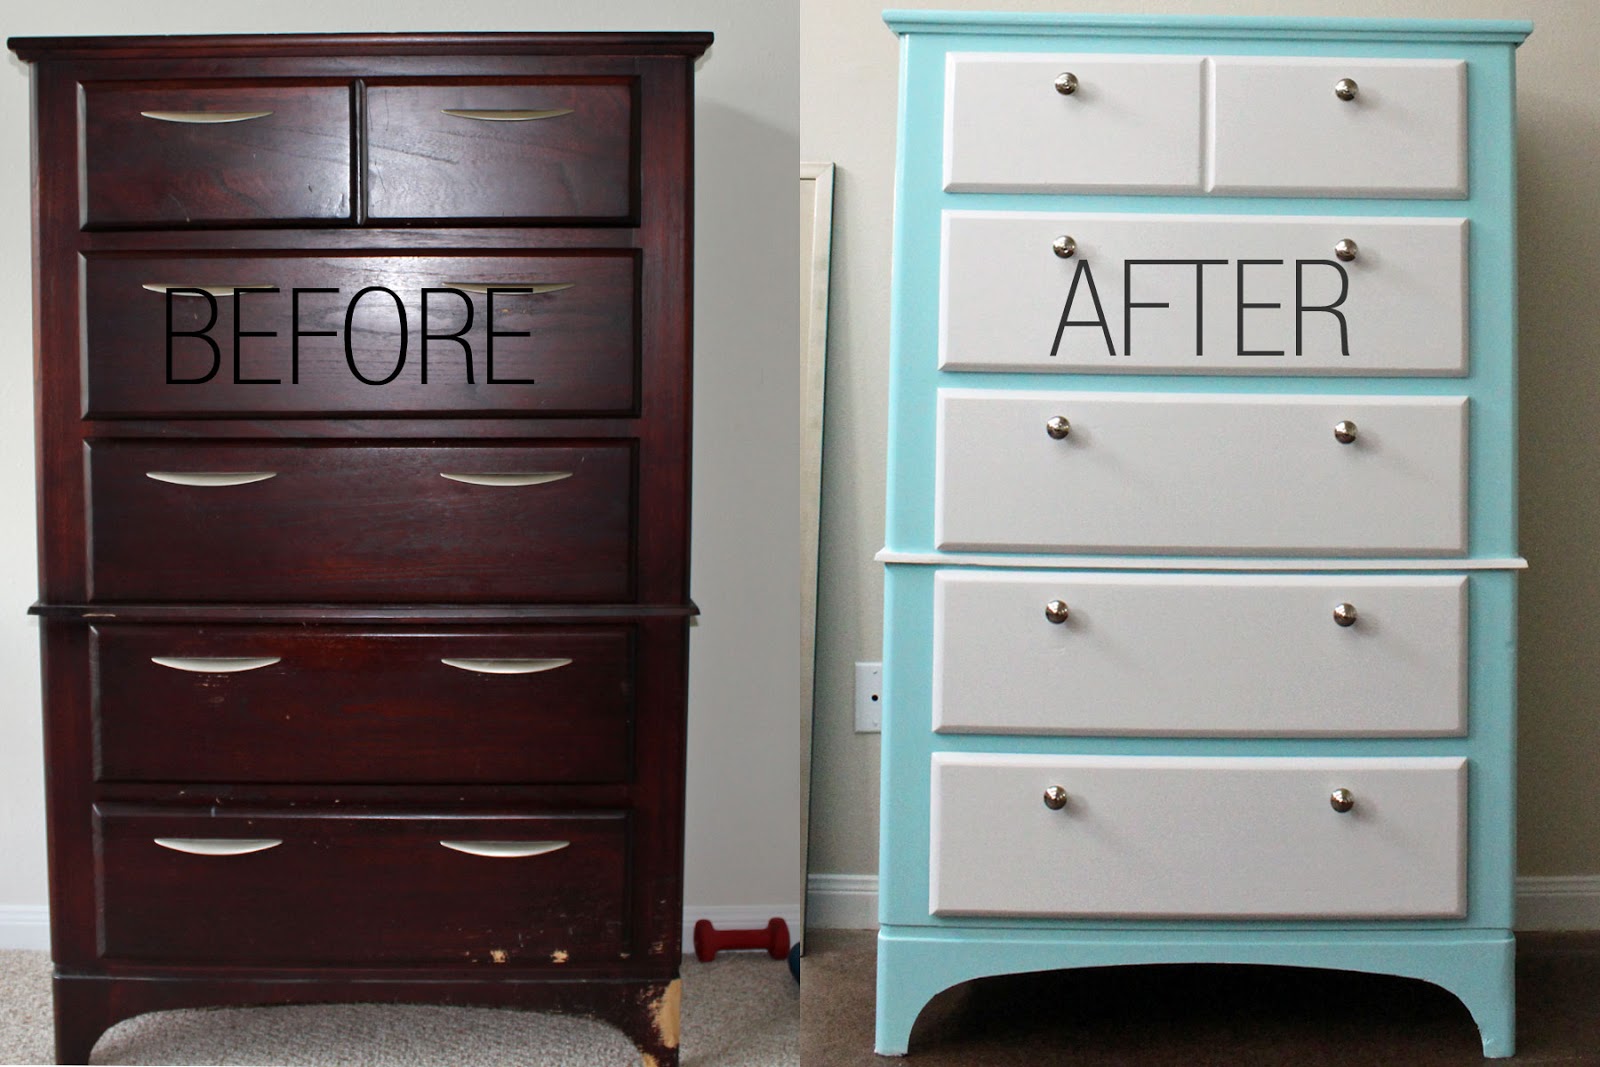
So this is the first piece that is complete.  I know, I know very Martha Stewart like.  I didn't even realize it until I put in the drawers. (You may have noticed that we also painted the walls...finally.  After 7 years of the same builder off white, we committed to Maison Blanche from Sherwin Williams.)


I followed Censational Girls advice and used her technique.

I first removed the handles and filled the holes with Elmers all purpose wood filler and sanded it.

(Yes, I was scared when I saw my drawers in this state). I am not sure if it is suppose to look this bad at this point, but YOLO!!!.    Once I did this I primed my with Zinsser red can (yeah  just look for the red can.  It comes in red, gold and blue and Censational girl prefers gold then red but we only have red in the local stores).
Now, I do not know if they are suppose to look so smooth but there they are. (Can you see all the pieces of furniture back there?  I count eight drawers in this shot alone. I primed each piece twice, sanding between coats.


After priming, I painted the dresser Swimming from Sherwin Williams and I don't remember the white color but it is a pure white. I'll update this post when I find it.  After painting, I used Minwax  Polycrylic in Clear Gloss but my husband didn't think it was glossy enough so we sprayed it Lacquer High Gloss clear from Rustoleum.  It gave it a little shine but not like we wanted it.  After further review and research, ok so one day while mesmerized by Pinterest, I discovered this pin.

Source Apartment Therapy
So my next project will use this paint from Benjamin Moore. It is a water based paint that acts like an oil...who knew?

Then came the scary part....I had to drill holes for the new knobs. I have a tutorial for that also.  I love the knobs I found at Home Depot from Martha Stewart.  They are substantial. That is to say, they are heavy and feel like quality pieces.

And yes, I did discover after I put the drawers in the dresser that the knobs are not center on the vertical but only on the horizontal.  I measured them 6 inches from the bottom of each drawer, per a suggestion in my research. I think they should be center...oh well.


 Maybe it is more Tiffany Blue?  I have more pieces to finish and share.

Friday, March 15, 2013

Lollipop Topiary

Pinterest has been a lifesaver. Well maybe not a lifesaver but definitely it has added flavor to my life.  I saw this lollipop topiary on Pinterest and had to try it.


You can see the original pin HERE.  But it didn't give any directions on how to do it, so I thought I would create one.  Here is a list of items you will need:


  • 6 inch styrofoam ball
  • big bag of dum dums or other lollipops ( I bought mine at Sams)
  • a chunky candlestick (mine came from Goodwill and that I switched candle holders)
  • hot glue

Insert lollipops into stryrofoam ball.  Leave room at the bottom to hot glue ball to candle holder. (I just kept inserting lollipops and then every once and a while I placed it on top of candle holder to see if I needed more lollipops)


Once you have all the lollipops inserted in the ball, hot glue ball to candle holder.  You may have to hold it for 30 seconds just to make sure it holds.  

It is extremely easy to make and took very little time.  I watched TV while I made mine. I would have spray painted my candle holder white but my daughter wants it in her room and wants it to remain black.